Send RCS Template Message (deprecated)
Sending broadcast messages allows you to reach multiple bot users at once with announcements, alerts, promotions, and updates. Broadcasts can be sent using approved template messages to ensure compliance with channel guidelines.
Activating broadcasts involves three key steps:
1. Create a Template Message
Before sending broadcasts, you must create and approve a template message.
- WhatsApp: Requires pre-approved template messages before broadcasting.
- RCS: Requires creating an RCS template message in the platform before using it in broadcasts.
Templates help maintain message quality and ensure compliance with channel policies.
Examples of template messages include:
- Promotional offers
- Order updates
- Service notifications
- Event reminders
2. Import Users
Upload the contact list of users you want to send the broadcast to.
This step ensures successful delivery by mapping users to their channel identifiers such as:
- Phone number (WhatsApp / RCS)
- User ID
Supported formats typically include:
- CSV
- Excel
Your contact list should contain valid phone numbers with country codes.
3. Create Broadcast Campaign
Once your template and user list are ready, you can create a broadcast campaign.
Steps:
- Navigate to Broadcasts in the dashboard.
- Click Create Broadcast.
- Select the channel (WhatsApp or RCS).
- Choose the approved template message.
- Select the imported user list.
- Configure scheduling options.
- Launch the broadcast.
The platform will then deliver the template message to all selected users.
Important Note for URL and Phone Number Buttons
After reviewing the template configuration, it is recommended to add a dedicated flow setup for URL and Phone Number buttons.
In RCS RBM, every button interaction requires a postback to trigger a bot flow. Even though URL and Phone Number buttons perform external actions (opening a link or calling a number), the platform still expects a postback path to be configured.
Recommended Setup
- Create a separate bot path (for example: Silent Path).
- Attach the URL or Phone Number button action to this path.
- Inside the path, add a Decision node.
- Configure the condition as something that will never be true, such as:
Why This Is Required
- RBM requires a postback event for all button types.
- The silent path ensures the message is successfully sent without triggering an unnecessary bot response.
- Since the condition (1 = 0) is always false, the flow will not execute any further actions.
Best Practice
Use a Silent Path for all URL and Phone Number buttons so that:
- RBM postback requirements are satisfied.
- The user experience remains uninterrupted.
- No unintended messages are triggered in the bot flow.
Steps to Create a New Broadcast
Navigate to the broadcast creation page from the Engati portal and configure the broadcast using the following fields
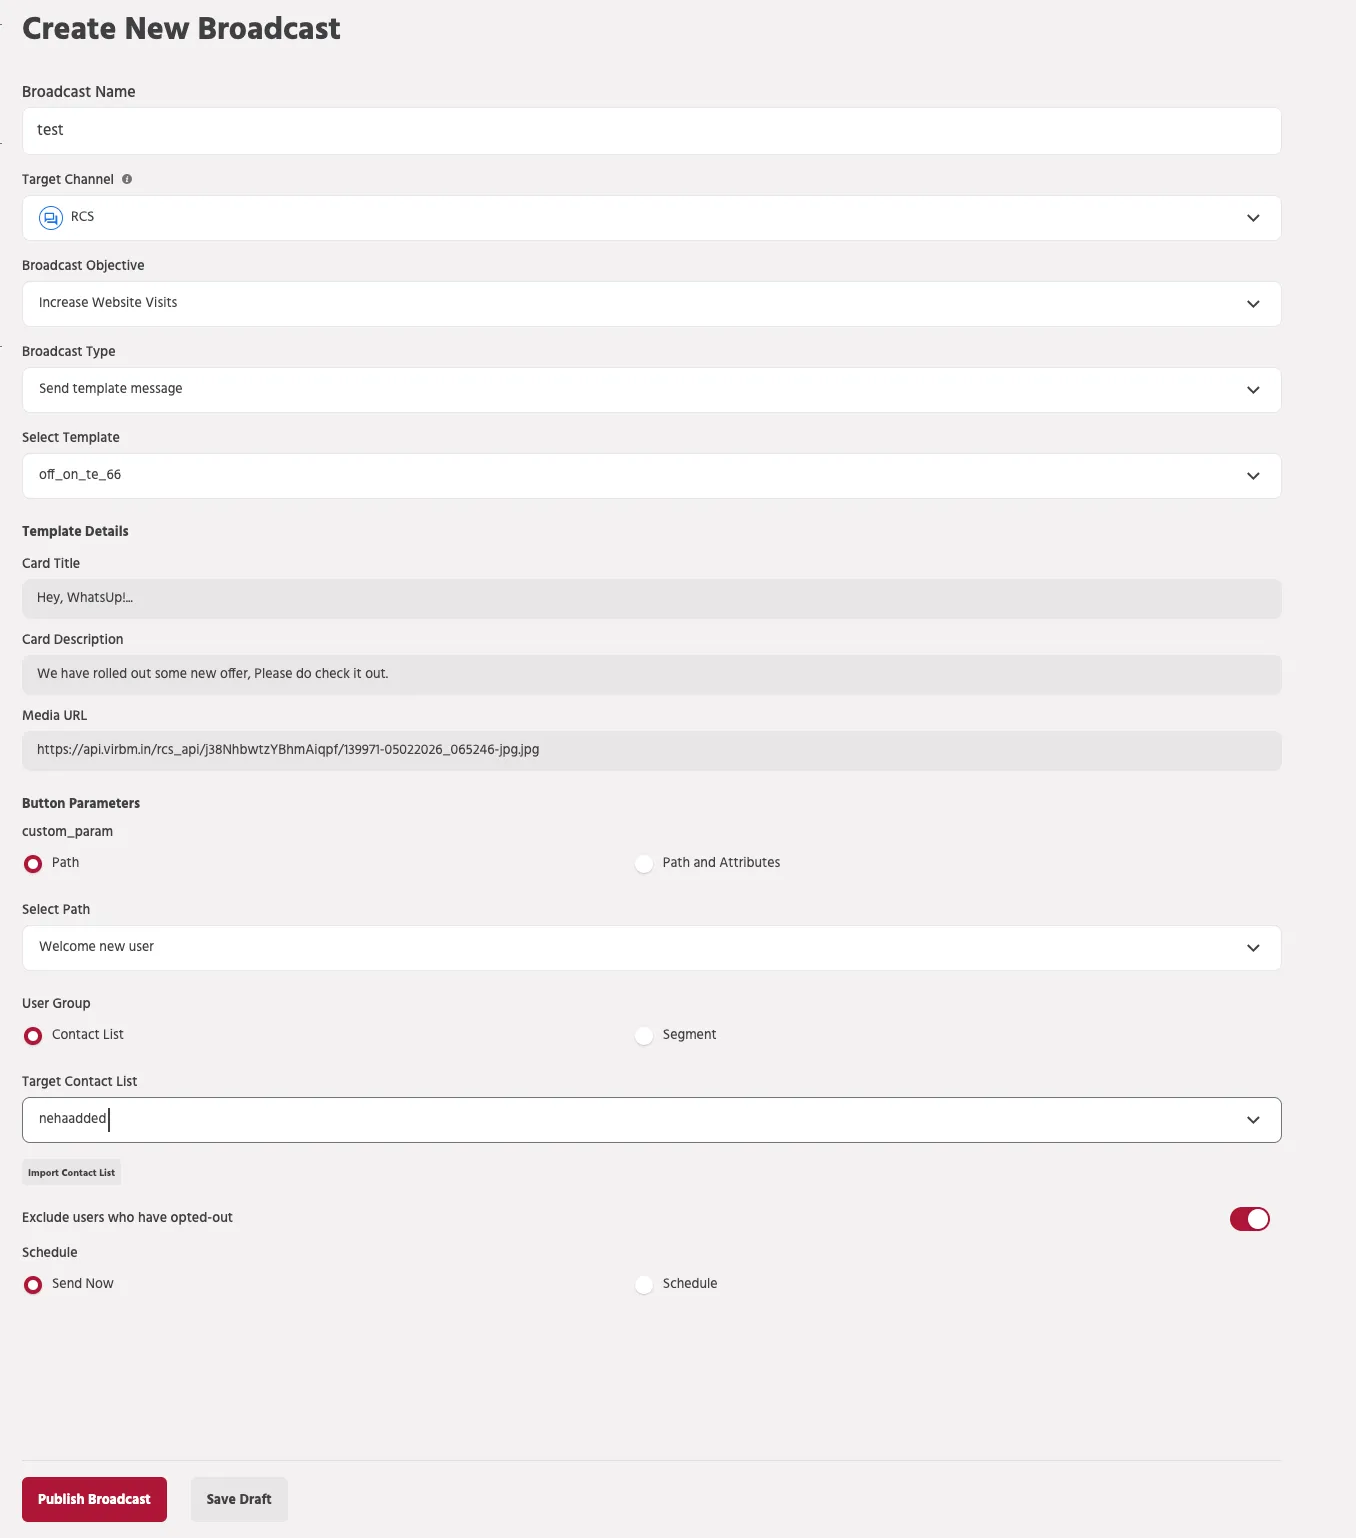
Broadcast Configuration Fields
Broadcast Name
The first field at the top allows you to provide a name for the broadcast campaign.
Example:
test
This name is used internally to identify the campaign in the broadcast list and reports. It is not visible to users.
Target Channel
This field defines the messaging channel where the broadcast will be sent.
Example:
RCS
Only users who are available on the selected channel will receive the message.
Broadcast Objective
This field defines the goal of the campaign. It helps categorize broadcasts for reporting and campaign tracking.
Example objectives may include:
- Increase Website Visits
- Promote Offers
- Product Announcements
- Customer Engagement
Example shown in the interface:
Increase Website Visits
Broadcast Type
This field defines how the message will be sent.
Example:
Send template message
When this option is selected, the broadcast uses a pre-approved RCS template created in the platform.
Templates ensure messages follow channel policies and maintain consistent formatting.
Select Template
Choose the approved template message that will be used in the broadcast.
Example:
ofon_te_66
Once selected, the template content automatically populates the fields below such as:
- Card Title
- Card Description
- Media URL
- Buttons
Template Details
This section displays the content that will be sent to users.
Card Title
The Card Title is the heading displayed at the top of the message card.
Example:
Hey, WhatsUp!...
The title should briefly describe the message or highlight the main announcement.
Card Description
This field contains the main message content delivered to the user.
Example:
"We have rolled out some new offer. Please do check it out."
This section provides details about the offer, update, or notification.
Media URL
The Media URL field contains the link to the media file that will be displayed in the broadcast message.
Example:
https://bb.branding-element.com/prod/13997/13997I-05022026_065528-png.png
Media can include:
- Images
- Videos
The media appears at the top of the card in the RCS message.
Button Parameters
Buttons allow users to interact with the broadcast message.
Custom Parameter
A parameter (such as custom_param) is used to capture button interactions and trigger the bot flow.
Path
Selecting Path allows you to route the user to a specific bot flow when the button is clicked.
Example:
Select Path → Welcome new user
When the user clicks the button, the conversation continues in the selected bot path.
Path and Attributes
This option allows sending additional attributes along with the path when triggering the flow.
This is useful when you want to pass dynamic data into the bot conversation.
User Targeting
User Group
Defines which users will receive the broadcast.
Two options are available:
Contact List
Send the broadcast to users imported via a contact list.
Segment
Send the broadcast to a user segment defined by filters such as:
- user attributes
- behavior
- engagement
Target Contact List
If Contact List is selected, you must choose the list containing the target users.
You can also upload a new contact list using the Import Contact List option.
Supported file formats include:
- CSV
- Excel
Phone numbers should include country codes for successful delivery.
Broadcast Controls
Exclude Users Who Have Opted Out
This toggle ensures that users who have opted out of receiving messages are automatically excluded from the broadcast.
This helps maintain compliance with messaging policies.
Schedule
This option controls when the broadcast will be sent.
Send Now
The broadcast is delivered immediately after clicking Publish Broadcast.
Schedule
Allows you to schedule the broadcast for a future date and time.
Scheduling is useful for:
- marketing campaigns
- product launches
- reminders
Final Actions
At the bottom of the screen, two options are available:
Publish Broadcast
Click Publish Broadcast to send the campaign to all selected users.
Save Draft
Click Save Draft to store the broadcast configuration without sending it.
This allows you to review or edit the campaign later.
Broadcast Preview
The platform provides a message preview panel that displays how the broadcast will appear on the user's device.
his preview includes:
- Media
- Card Title
- Card Description
- Buttons
Always review the preview before publishing to ensure the message appears correctly.
Best Practices
- Verify the template content before sending the broadcast.
- Ensure the media URL is valid and publicly accessible.
- Confirm the correct contact list or segment is selected.
- Use test broadcasts before sending large campaigns.
- Make sure button paths are correctly configured to handle user interaction.
Following these practices helps ensure smooth broadcast delivery and a better user experience.